
Before I get started with today's tutorial, I want to make a quick announcement!!
Nov. 20 - Dec. 15
Nov. 20 - Dec. 15

Starting on Sunday November 20th, I'll be hosting the "26-Day Christmas Craft Marathon" here on my blog!! It's going to be a really busy 26 days for me and you!! Read more about it HERE!!
~*~*~*~*~*~*~*~*~*~*~*~*~*~*~

Inspiration
I combined the following two projects in order to come up with this design:
By the way, I'm going to have to dig out some of my beads and charms to make some with the little dangle part added!!
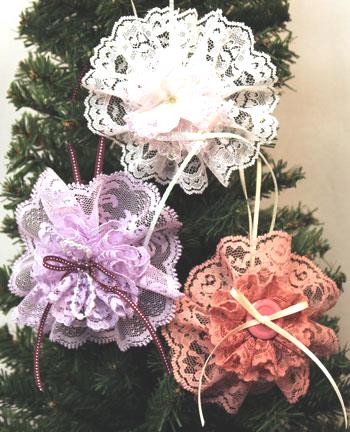 When I found the tutorial for these Lace Flower Ornaments on funEZcrafts, I knew that I could combine these flowers with the snowflake for an awesome ornament! I'm just happy I was right!!
Keep in mind that since I wanted a very white snowflake, the materials I chose were white or a bright off-white. Because of this, you'll notice that my camera didn't handle these photos very well!!
Step 1: GATHER SUPPLIES
- Plastic snowflake (15 cents - 6/$1 at Dollar Tree)
- Silver jingle bell (8 cents - 48/$4 at Joann's)
- 6" Piece of 1/8" ribbon (2 cents - 5yds/$0.25 on sale at Michael's)
- Glue (on hand - I used Aleene's Fast Grab Tacky Glue...again!)
- Cardstock (on hand - use junk mail if needed)
- Sheet music (about 10 cents - huge lots of ephemera for $10 here)
- Glitter glue (5 cents - $1 for a bottle at Michael's)
- 12"-15" Lace about 1" wide (about 10 cents - $1-$2 for 5yds here)
- 4" 24g Wire (5 cents - spool/$4 at Michael's)
- Fake flower with the stem removed (5 cents - $1 per bunch at Dollar Tree)
- Plastic gem (5 cents - 1lb/$9 at Hobby Lobby with coupon)
Step 2: PREP SNOWFLAKE

Thread ribbon through the hole at the top of the snowflake.
Add the bell to the front section of ribbon.
Pull the ribbon back through the hole.
Tie a knot.

Add "Base 1"
Cut or punch out a 1" circle of cardstock.
Glue to center of snowflake.
Mark the center of the snowflake on the circle.
Step 3: ADD CONES

Make Cones
Cut or punch out six 1" to 1.5" squares of sheet music.
Roll squares into cones by overlapping one edge over an adjacent edge.
Glue into place.
Spread a thin layer of glitter glue on the pointy section of the inside of the cone.
Add a light crease to each side of each cone so that the both ends are pointing away from one another.

Add Cones to "Base 1"
Glue cones to "Base 1". Leave a small circle in the center and make sure each cone is "pointing" away from your center mark.

Add "Base 2"
Glue to center of snowflake.
Step 4: ADD LACE

Thread Lace onto Wire
Fold over one end of the wire a few times to make a "knot".
Use the other end of the wire as a needle.
Sew a slip stitch (just go up and down) through the very bottom of the lace.

Make Lace Circle
Push all of the lace to the center of the wire.
Wrap the lace-covered section of the wire around your finger.
Twist the ends of the wire about 4 times.
Clip the ends and pinch them together.
Tuck the twisted section of wire towards the center of the circle.
Form the wire into a nice circle.
Spread the lace around the wire evenly.

Attach Lace Circle
Add a generous layer of glue to "Base 2".
Center lace circle over your snowflake and over "Base 2".
Press the lace circle into the glue.
Flatten the lace so that it will accept the next layer, but not too flat that it looks bad.
Step 5: ADD FLOWER

Make Flower
Cut or punch out a 1" circle of cardstock.
Using scallop-edge scissors, cut around the very edge of the circle.
Add a layer of glue to the entire circle.
Attach the bottom of the flower to the circle.
Add glue to the bottom of the plastic gem.
Attach gem to the center of the flower.

Add Flower
Cover the bottom of the completed flower with a generous amount of glue.
Add the flower to the center of your snowflake.
FINISHED!!


~*~*~*~*~*~*~*~*~*~*~*~*~*~*~
UPDATE

TOTAL SPENT = $3.00
Items made: 2 paper flower ornaments, 1 Ribbon Tree Ornament, 2 Paper & Lace Snowflake Ornaments
Note: Although I'm already at $3.00 for this challenge, with the supplies I have left over right now, I will be able to make another 2 Ribbon Tree Ornaments and 4 Paper & Lace Snowflakes.
Thanks for reading!! Until next time...


Very pretty! Love the sheet music details!
ReplyDeleteThanks for sharing...it's beautiful!!
ReplyDeleteSally
loveofhomes.blogspot.com
I like the combo of paper and lace!
ReplyDeleteSo cute and clever! Love the layers and texture. Would not have thought of all this. Well done!
ReplyDeleteLisa,
ReplyDeleteI LOVE your version, thank you so much for sharing a link to the tutorial. Happy Christams crafting!
Very pretty ornament. I would love for you to share at Bacon Time, the weekly linky is Fri-monday. If you like giveaways, I have some great ones going on, including 66 giveaways in one post for Breaking Dawn, and a Shabby Apple Dress. Please stop on by.
ReplyDeletehttp://bacontimewiththehungryhypo.blogspot.com/
Thanks so much for linking up to Inspire Me Monday. I have a special "25 Days of Christmas Ornaments" Linky Party that I would love for you to link these up to as well!
ReplyDeleteJulie @ Singing Three Little Birds
http://singingthreelittlebirds.blogspot.com/2011/11/25-days-of-christmas-ornaments-linky.html
Oh so pretty!
ReplyDeleteI love this and can't wait to give it a try!
Thank you so much for sharing!
Michele
This is lovely! My daughter spied your tutorial over my shoulder and has asked to make some of these tomorrow. Thanks for the mother-daughter craft inspiration!
ReplyDeleteThese are so lovely! Thank you!
ReplyDeleteLisa, it's absolutely gorgeous! I love the combination of the vintage lace and sheet music. I'm featuring your post on my Facebook today.
ReplyDeleteIn this week of Thanksgiving I especially want you to know how grateful I am to have you be a part of the creative spirit and camaraderie at Rook No. 17. Thank you for linking up to “A Little Birdie Told Me…”!
Yours,
Jenn
Very nicely done!
ReplyDeleteLovely!
ReplyDeleteThanks for linking it up to Show & Share!
Such a delicate and pretty snowflake! Thanks so much for sharing it at the Winter Wonderland party!!
ReplyDeleteThis is so so cute! Thank you for sharing how you did it!!!! And thank you SO much for linking up over at Crafty Scrappy Happy!!!
ReplyDeleteJaime from crafty scrappy happy
It's so pretty it's hard to believe it cost so little! Great tutorial too! I would love to have you share your ornament at my party!! http://theshadyporch.blogspot.com/
ReplyDeleteBeautiful ornament! Thanks for sharing at Shine on Friday. We hope to see you again soon.
ReplyDeleteHey Lisa, your ornament tutorial placed in the top three on the Head to Head Showdown, way to go! Come grab a button if you'd like! ~Jen
ReplyDeleteThis is just GORGEOUS! We would love to have you link up at Crafty Lassie Tuesday, Sew Stylish Boutique. Here is the link >>> http://sewstylishboutique.blogspot.com/2011/11/crafty-lassy-linky-party-14.html
ReplyDeleteSo beautiful! I love snowflakes. I would love to have you link up at my Handmade Christmas party!
ReplyDeletehttp://cupofdelight.blogspot.com/2011/12/link-party-delightfully-handmade.html
Very cute and a great tutorial Lisa.
ReplyDeleteI'd love it if you could link this project to my Simply Christmas Inspiration party at http://shabbyartboutique.blogspot.com/2011/12/inspiration-friday_09.html
I featured this today! If you want, you can grab a featured on button from right sidebar.
ReplyDeletehttp://cupofdelight.blogspot.com/2011/12/delights-of-week-features-from.html
Thanks for linking up your snowflake ornament-it's adorable! Feel free to link up any other great ideas at this months party here:
ReplyDeletehttp://www.inspirationforcelebration.com/2011/12/its-celebration-link-party-december.html
Thanks! I'm your newest follower!
Christina
www.inspirationforcelebration.com